Alerts in AWS Quicksight is a feature that helps the users to keep track of the significant changes in the data. Currently, the alerts can be set on two visuals in the Quicksight dashboard. They are
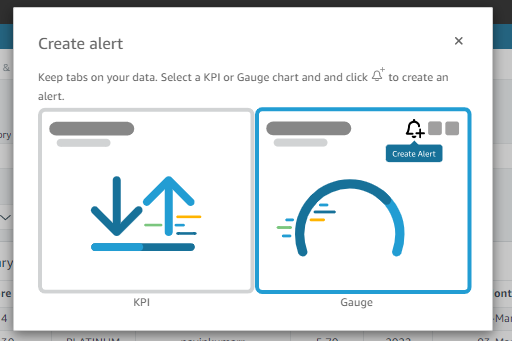
- KPI visual
- Gauge visual
Threshold alerts:
Threshold alerts in the Quicksight dashboards are nothing but when the visual value meets the threshold value, alerts are triggered, and you’ll receive an email intimation that the value exceeds or below the threshold value. Additionally, at any time you can come back and modify the alerts as per your necessity in the QuickSight dashboard.
The alert settings remain unchanged even if the author changes or removes the visual after the alert is created. Any filters that have been applied to the visual at the time the alert is created are also applied to the alert. Your current alert remains the same whether the admin or the author changes the filter. In addition, users can create multiple alerts for a single visual
Steps to create alerts:
Following are some of the procedures needed to follow in order to create threshold alerts for KPI and Gauge visuals in the Quicksight dashboard.
- Log into the QuickSight panel and open up the desired dashboard.
- Choose the KPI or Gauge visual on the dashboard for which you wish to create an alert.
- Select the Create alert icon from the menu in the upper-right corner of the visual.
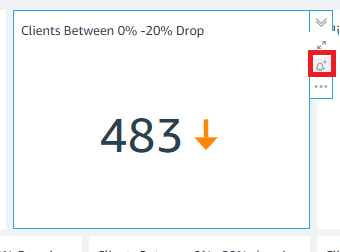
- Upon clicking the alert icon, a pop-up will be shown with details to be filled in for the creation of the alert.
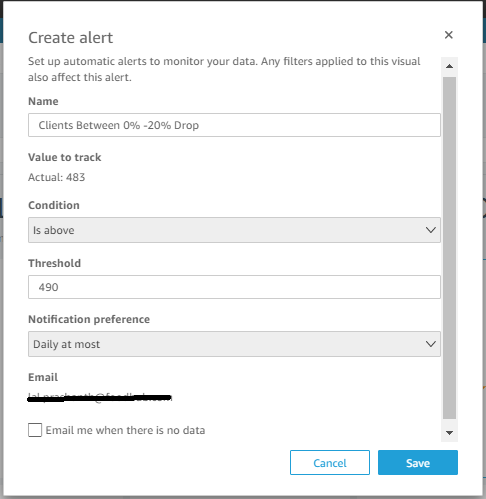
- Here, the name represents the name to be entered for the alert, by default, the alert is going to have the name of visuals but it can be altered and renamed.
- Value to track is nothing but the value of the visual at the moment and it changes over time based on the changes in the data source. It is the most recent value, and it is shown here so you can use it as a guide when picking a threshold.
- Condition, Select a threshold requirement for Condition. You can select any of the subsequent conditions.
Is above – Establishes a rule that the alert will activate if the alert value exceeds the predetermined threshold.
Is below – Establishes a rule that the alert will activate if the alert value falls below the threshold you specify.
Is equal to – Creates a rule so that when the alert value reaches the threshold you set, the alert will be sent. - The threshold tab represents the value to be entered which prompts the alert.
- Under Notification preference, select how frequently you want to be notified when the threshold is exceeded. The choices below are available for selection.As frequently as possible – This choice notifies you each time the barrier is crossed. This option may result in many alerts being sent to you each day.
Daily at most – This choice notifies you once daily if the threshold is exceeded.
Weekly at most – When the threshold is crossed, this option notifies you once each week. - Notify me when data is not available – When you choose this option, you will be informed when there is no data for your alert rule to be checked against.
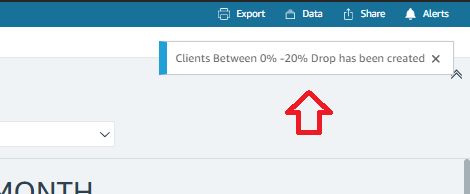
Once everything is filled in, you will have to click the save button. Following this, you will see a notification on the upper-right of the dashboard stating that the alert has been successfully created.
Manage dashboard alert:
Now, clicking the alerts button on the dashboard will give the following pop-up with all the active alerts. You can change the settings for your current alerts, turn them on or off, or get a history of when the alarm was activated.

In the above picture, we have two alerts activated. Here, the Edit option allows us to edit the existing alerts to change the condition or change the threshold value and the history option gives us the list of alerts that were activated before. In our case, the alert has not been triggered yet. Alerts can be turned on or off as and when it’s required.
Learning is what makes me excited. I have a handful of experience as a data and BI analyst with broad skills across various tools. I am also a person who take up challenges and who work for it untill it get resolved. I have learnt to be spontaneous and precision in problem solving because of the experience over the years.